Pages

Thursday, June 21, 2012

DIY Wedding Shadowbox


My friend Emily got married in September and her mother surprised her with a gorgeous wedding shadowbox for Christmas which was  done by a professional. When I saw it, I fell madly in love with it, but knew that it was out of my price range. Even though it was worth the money ( the woman who made it meticulously hand painted each and every petal of Emily's bouquet then put it all back together), we were completely broke after our wedding, so I decided to try and make my own version. I'm thrilled with the outcome and the price ($36.00).

Time: 1 hour

Supplies:

Shadowbox (I bought mine at Hobby Lobby with a 40 % off coupon)
Dried bouquet and boutineer
Other wedding tokens
Pins
Tape

Steps:
1. When you get home from your wedding, (or have someone do this step for you) hang your flowers upside down in a dark room or closet. In hindsight, it may have been better to take it apart and hang each flower individually (but taking an hour to do this might not go over too well with your new husband...;)

2. After you get back from your honeymoon and the flowers are completely dried out, you will need to deconstruct the bouquet. You will need to do this because your bouquet is probably too fat to fit in the shadowbox.

3. Put the bouquet back together by stacking the roses. What I mean by this is, don't make your bouquet round---make it flat on the back and stacked in the front (opposite of the "Baby Got Back" song...ha) You may think the flowers will be too delicate to do this, but mine were very sturdy, and this worked perfectly.

4. Pin the bouquet to the board. Then, as you can see from the picture above, you will need to remove any unsightly petals (this is where the professional earns her pay because all the petals would be painted the exact color of your original flowers if this were done by a professional).


5. Pin or tape the rest of your items on the board. Replace frame and you are finished!


I wanted to use our original vows, so as you see, my husband did some editing to his as he went along haha. I like to think this adds charm :)

I love the rustic look that my flowers took on ; they match perfectly since we had such a lovely rustic wedding

Tuesday, June 19, 2012

Western Shirt turns Summer Sundress

This thrift store western shirt has turned into one of my favorite sundresses! It was super easy to make too!

Time: 30 minutes or so depending on sewing skills

Supplies:
A man's shirt (this one was a 2X) It's pretty short on me, so watch the length as well.
Sewing supplies
A dress to go by

Steps:
1. Find a dress that fits well

2. Lay the fitted dress over the big shirt and, using a fabric marker, draw the outline of your fitted dress. Be sure to give yourself about an inch for the seam

3. Cut through the front and back of shirt along the lines of the outline.

4. Turn the shirt inside-out and sew back together

5. Do something with the sleeves. I decided to quarter mine.


Tuesday, June 5, 2012

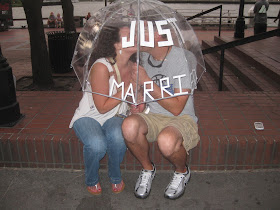
Just Married Umbrella


Ok, this project isn't upcycled, but it was the best 19.75 I've spent for something new in a long while  :)

We are back from our honeymoon (lots of wedding posts and pictures to come....an AMAZING day), and this umbrella is still being used simply because it makes me giddy every time I use it. First of all, we just happened to be visiting Savannah, GA and Hilton Head, SC the same time Beryl  decided to drop in. We were surprisingly blessed with mostly clear weather though...so clear in fact, that we almost didn't get to use our Just Married umbrella that I made and adore! Beryl did give a us one evening of showers however, so Aaron was a great sport and a perfect gentleman and carried our umbrella for us. We had a ball with it! Everyone on the streets would get a big smile on his or her face when they passed us, and a lot of people wanted to take pictures for us and give us their congratulations  :)

Supplies:
1 Clear Bubble Umbrella (I got mine from Amazon)
White duct tape

Directions:
Cut tape in blocks then cut in half length wise
Form letters on umbrella

I thought that the duct tape wouldn't stay very long on the umbrella, but even after multiple uses, it's still holding strong. I debated whether paint would work better since it took a while to form the letters, but I'm glad that I went with the tape since I can take it off (if I ever have the heart to) and use the umbrella for regular use.

 I got this idea from this picture on Pinterest